Processing Sales and Admissions

Our museum uses a Square Register device for processing on-site payments. This works as our cash register point-of-sale as well as our admissions tracking computer.
For anyone who has worked in retail, and even for many who have not, this is a rather intuitive system. It may look complicated at first, but is very simple to use.
If the screen is off when you go to use it, press the button on the center of the screen’s bottom edge. If it does not come on immediately, hold the button in until it boots up.
Lets get started with a breakdown of the register screen
There are three parts to the main screen view: The Category Menu, the Product Menu, and the Transaction.
Ignore the information in the horizontal top (“Customer Display…”) and bottom (“Checkout, Transactions, Items, etc.) bars, which you should not need to worry about at all.
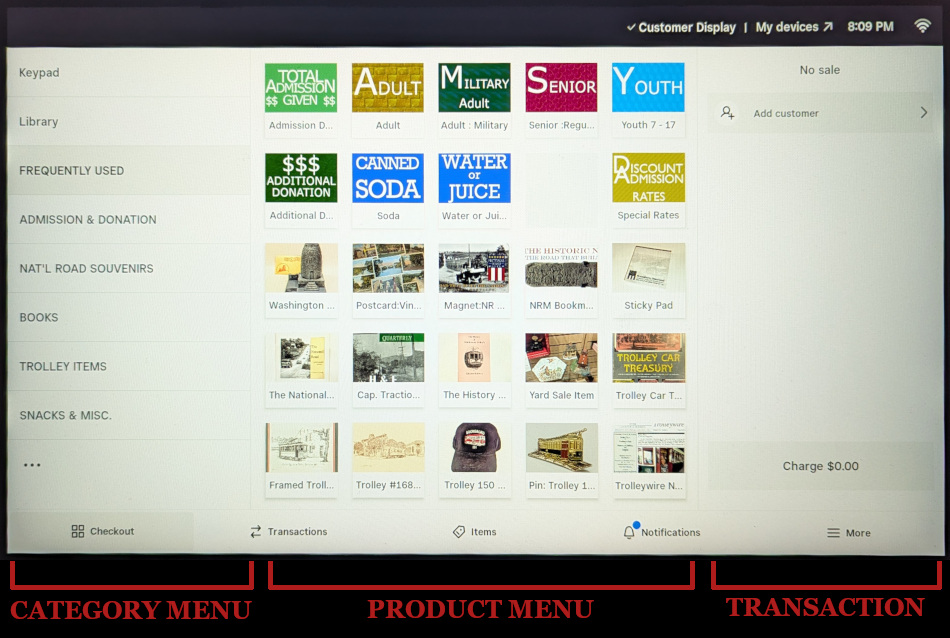
Category Menu
This menu is a list of the different groupings of products we offer, arranged in order to help you find products easier. Some items show up in multiple categories to further aid you in finding them.
By default, the “Frequently Used” screen will be open. This has items used most often all on the same page.
Pressing on these category names with your finger will open that category’s Product Menu.
At the top, “Library” lets you scroll through a list of everything we have to offer. (“Keypad” lets you enter a money amount without a product so we don’t use that.)
Product Menu
This is the list of items within the selected category. Most items have an image of the product to match with, while others have an easy to read text button.
Pressing on these items with your finger will add them to the Transaction.
Some items will occasionally open an additional window allowing you to enter the cost (if it isn’t a fixed price) or select an additional detail.
All taxable items will have sales tax added automatically.
Transaction
This section is where the register keeps track of your selections. Think of it as a preview of what the customer’s receipt will look like. It should list every item they are paying for, allows you to add their name onto the transaction, and is where you will find the link to proceed to the money collection step.
Adding Visitor Admissions to the Register
The most common task our greeters use the register for is collecting of admission donation money. Let’s take a look at how this is done.
You can use the buttons on the “Frequently Used” category page, or go to the dedicated “Admission & Donation” page (shown below)

Total Admission Given
This button is where you will enter the money amount being given for admission. This is the only admission entry for money, the individual age group buttons do not have any money amount associated with them.
Since we don’t have fixed admission amounts, but rather a suggested donation, guests may pay whatever they are comfortable giving. When you press this, a window will open allowing you to enter a dollar amount. When that happens, enter the total being paid for the whole group, and then press “add” to save that amount.
Do not use this button if the visitor shows an active National Road Museum Membership e-card.
Adult / Military / Senior / Youth
These buttons are for counting the total number of people being paid for. After entering the amount being paid, press each button once per corresponding member of the group. In the example below, you will see that the listing reads “Adults x2” “Youth x3” and “senior” which means two adults, one senior, and three children were in the group.
In the near future, new buttons will be added reflecting our membership. “Member Adult,” “Member Senior,” and “Member Youth” will work the same as these buttons, but will be used exclusively to record our members who return to visit.

Other Buttons
This screen also has a button for “Additional Donation” – use this button when someone is making a donation with cash or card through the register that is NOT associated with their entry into the museum, or if they went through the museum for free or a discounted amount and have already been counted, but want to give a donation as they leave.
The “Discount Admission / Special Rates” button in the bottom corner is used for special occasions, such as home school and other special tours where individuals will pay their admission instead of a group lump sum.
Adding Products to the Transaction
If a customer wants to make a gift shop purchase, they may do so either with the gift shop items by themselves after their tour, or combined all at once with the admission at the very beginning of their visit should they find something immediately upon entry. The latter will occasionally happen when a visitor arrives thirsty and purchases a drink from the cooler with their admission, for example.
Adding gift shop items functions much the same as entering admission information.
Simply find the item the customer wishes to purchase by exploring the various category product pages, and then press the item once with your finger. In nearly every case, the item will be immediately added to the transaction along with any sales tax, and no other information about the item will be required.
Features of the Transaction Column
In addition to listing the products, there are a few other features in the Transaction column of the screen

Options Button
The top tells how many items total have been entered. Beside it is the Options button, which looks like three horizontal dots. This causes a list of additional options to appear beside the dots when pressed. Generally the only option that will appear will be “Clear Items” which will delete EVERY item in the transaction and allow you to start over from scratch.
Add Customer
More information on this is below. This lets you add a customer to the transaction by searching existing saved customers or adding a new customer.
Transaction Items
Each item you enter becomes a link here. Pressing an item will open a details popup window, allowing you to make changes or see more details about the item. Scrolling to the bottom of this popup window will take you to a link to remove the item or service from the transaction. (Note: if there are multiple of that item, such as the Adult x2 seen here, it will clear BOTH adult entries, not just one.)
Add Discount
This is where you will go to add a membership discount, if applicable, to gift shop sales. Otherwise you don’t need to worry about this.
Charge $__.__ Button
Once the transaction list includes everything the visitor is paying for, press this button to proceed to the checkout screen.
Adding Customers
If a transaction is for a museum member, or if a donor is making a donation of more than $200, their information should be added to the transaction.
In the Transaction column, press “Add Customer.” The window seen below will open. You will see a list of names appear under the search bar, and as you type in a name, it will refine the search. Once the visitor’s name appears in the list, you can press it and their name will appear above the items in the Transaction column.
Members will always appear in this menu, as we will add them to the system when their membership is approved.
If a donor is not in the system, you can press the “+” to the right of the word “Customers” at the top. This opens a new dialogue screen where you can enter the customer’s information. They also have the ability to enter their own information on the credit card screen facing them, and if they begin filling it out your screen will tell you they are entering information.
Once the information has been entered, be sure to press “Save” in the top right of the dialogue popup. The visitor should automatically add to the transaction and their name will appear above the items. If not, follow the above steps and they should appear when you search.

Checking Out
Once you have entered everything into the Transaction column and pressed the “Charge __.__” button, the sales popup will appear.
You don’t have to do a thing if the customer is paying with:
- Debit Card
- Credit Card
- Phone or Watch Tap Payment
- CashApp QR Code payment
The customer takes care of every step for those transactions on their screen.
If for some reason their card will not tap, read chip, or swipe, you CAN press “Manual Credit Card Entry” and then type in the numbers on the back of their card.
If a customer is paying with Check
Swipe up to go to the bottom of the payment option lists. There is an option there for Check. Checks can go in the slots on the front of the cash drawer. If they won’t slide in easily, the coin tray lifts out and allows access to that spot.
If a customer is paying with Cash
You will notice that near the middle of the screen, there is the word “Cash” followed by a string of different dollar amounts in blue. These are the most likely payment amounts you might receive from the visitor. The first is always exact amount, followed by next higher dollar amount, then rounded up to the nearest 10 and nearest 20. If the customer gives you a different amount, you can press “Custom” and enter what they gave you. In any case, pressing one of these amounts will register that amount was given to you, and any required change to be given to the customer will appear on the screen.
Additional notes for cash transactions:
All cash transactions entered into the Square register must be placed into the cash drawer under the counter. Donations placed into the donation jar at the desk should NOT be added into the register. Don’t finalize the transaction by selecting an amount on screen until you have the money in your hand.
DO NOT accept any bills larger than $20 if change is required. We do not keep enough money on site to break large bills.
The exception to this rule is in cases where a donor is giving a larger donation and are gifting the entire bill to the museum, or if a customer’s transaction is close to a large bill amount (i.e. their total is $44 and they want to pay with a $50, or $96 and they want to pay with a $100 bill).
For large bills, they may be slid into the slots on the front of the cash drawer. If they won’t slide in easily, the coin tray lifts out and allows access to that spot.
The “Split Amount” link in the top right corner allows a visitor to pay part in cash and part with card.

After the Transaction
We do not print receipts. Customers will be given the option on their screen to have a receipt sent to them via email or text. If they have used a Square device through another business at any time, their receipt may automatically email or text to them without prompting for their choice.
Thank the guest and ensure they have all of their purchases.
Once the customer has made their selection, you may press “New Transaction” on your screen, and begin helping the next visitor.